Back to Basics
Mobility First
Before we look at each of the recommended core stability exercises, it’s important to understand the difference between flexibility and mobility!
Flexibility is the ability of a muscle or muscle groups to lengthen passively through a range of motion
Mobility is the ability of a joint to move actively through a range of motion
It should be a priority to address any significant mobility restrictions at the hip and thoracic spine. If mobility in either of these areas is restricted it can lead to movement compensations at the low back. If hip mobility is limited during the squat the pelvis can be pulled under creating posterior pelvic tilt as the lumber spine will have to compensate for the lack of mobility at the hips. This will place flexion under load on the Lumber spine which will place excessive stress on the discs.
If you only performed isometric core stability work but neglect significant mobility restrictions in the joints above or below the lumbar spine, the core stiffness you created will be compromised.
The ‘Cat-Camel’ is one of the mobility movement Dr. McGill recommends prior to performing the Big 3 to reduce low back stiffness and improve the mobility of the spine. This exercise emphases mobility in a very spine-friendly manner.
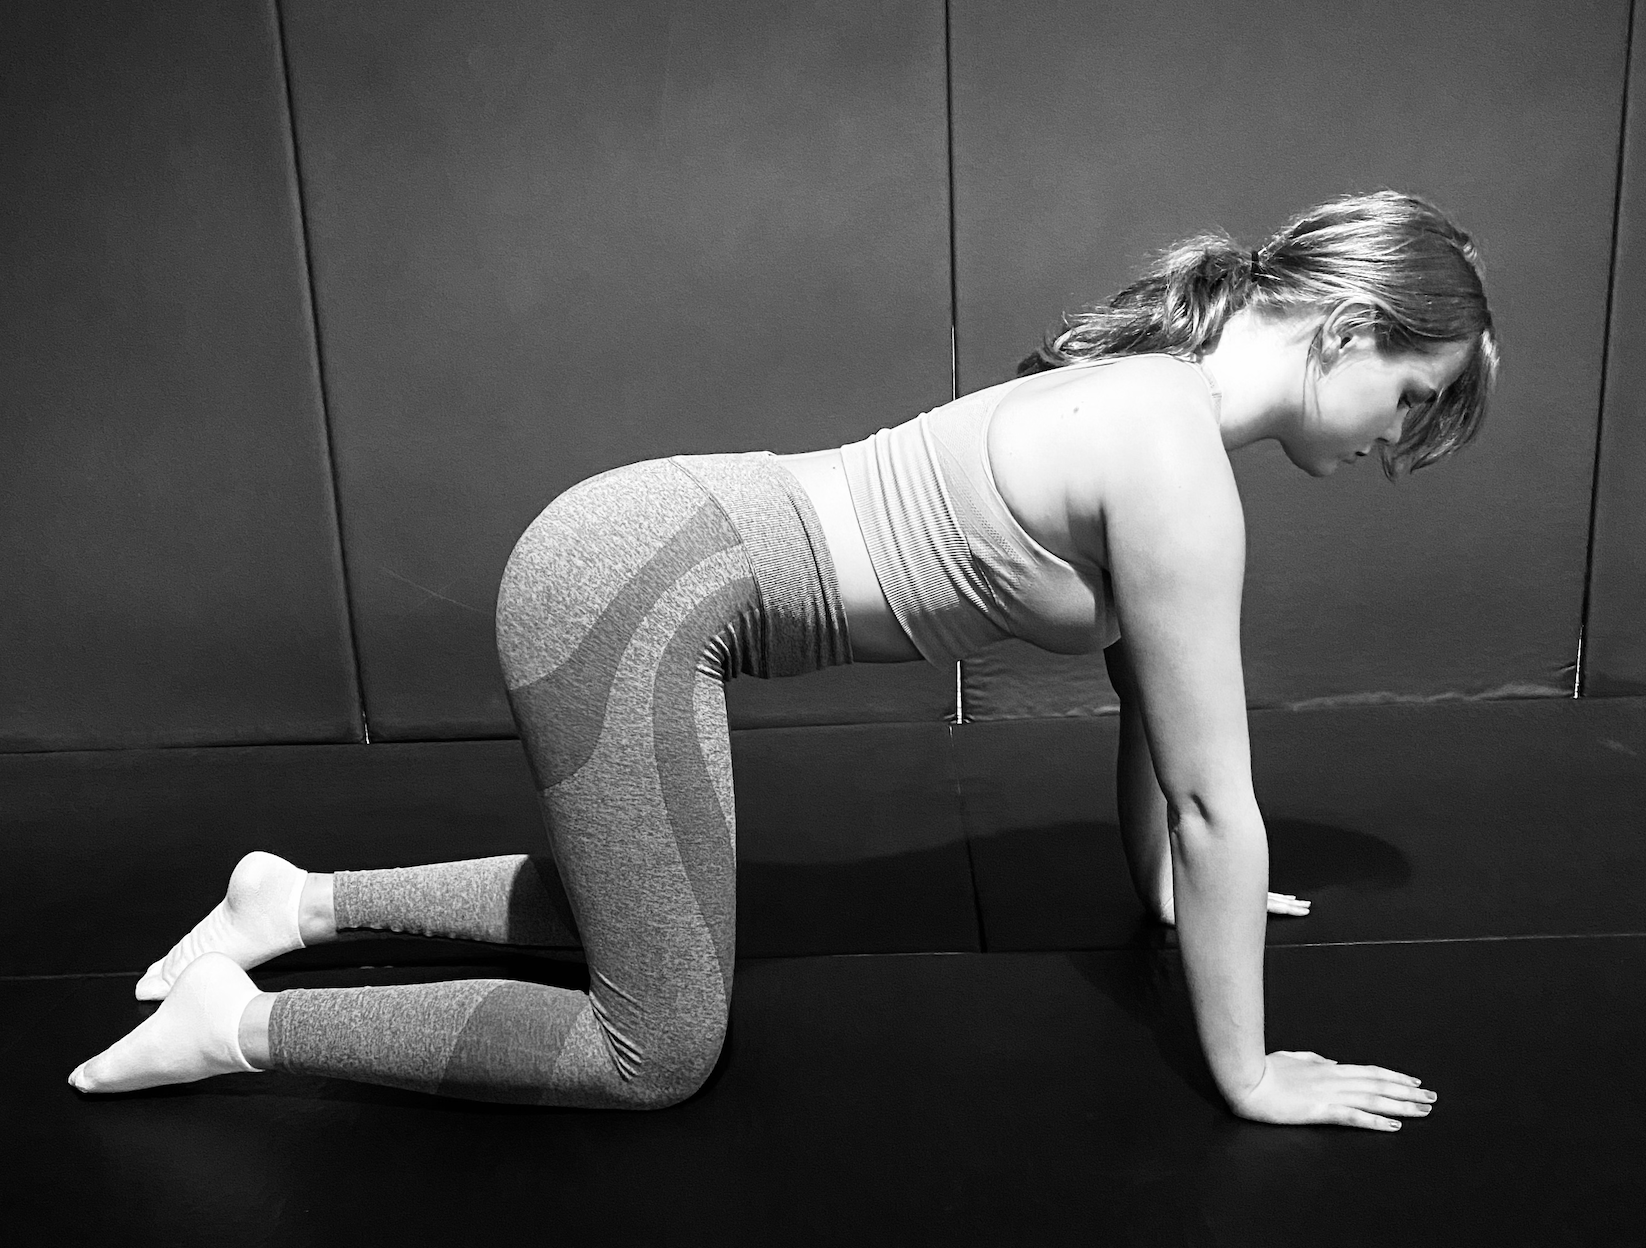
Cat-Camel
Step 1: Assume an all-4’s (quadruped) position on your hands and knees.
Step 2: Slowly arch your entire spine and hips as high as possible without pain into a flexed or rounded position. You should end with your head looking down towards the ground. This is the camel position. After pausing for a few seconds move into the opposite downward extended position with the head looking up (the cat). Make sure you only move into a light stretch for each position and do not force your spine into any pain.


Perform 5-6 cycles of this exercise before moving on to starting the Big 3 with the curl-up (11).
The Modified Curl Up
Most people when they ‘crunch or sit ups’ have been taught to ‘curl up’. They bend their entire spine and attempt to bring their chest up towards their knees. While this exercise does activate the anterior core muscles to an extent (especially the rectus abdominis) the ‘crunch’ motion does a few things that isn’t optimal for those currently dealing with back pain.
The motion of the classic sit-up places a large amount of compression on the spine that can flair up symptoms for those who are ‘load intolerant’ (17). This movement pulls the spine out of its neutral slightly arched position and flattens it into flexion. If your low back pain (symptoms) increase with bending forwards (flexion intolerance) this movement should be avoided at all costs.
The traditional sit-up also relies heavily on the psoas muscle of the anterior hip to pull the torso towards the thighs. When you think you’re isolating and sculpting a 6-pack by doing endless sit-ups, you’re actually mainly strengthening your hip flexors. (16)
A more efficient way to stabilise the anterior core muscles is to perform a modified curl up.
Step 1: Lie on your back with one knee bent and the other straight. If you currently have pain that radiates down one leg, flatten that leg out against the ground. Place your hands under your low back (this will ensure your spine remains in a neutral slightly arched position during the next step).
Step 2: Pick your head off the ground only a few centimetres and hold that position for 10 seconds. If you’re resting your head on a pillow, imagine it as a scale and lift your head off of it only enough to make it read “zero” on the dial or screen (2). The goal is to perform this curl-up without any movement in the low back! If you raise your head and shoulders too high (like a traditional curl-up or crunch) your low back will round and excessive forces will be transferred to the spine that could increase your symptoms.
Step 3: After a 10 second hold, relax your head back down to the resting position. You can progress this exercise and increase the difficulty by bracing your abs before moving you head or raise your elbows from the ground to decrease your base of stability (3).

Recommended sets/reps:
The endurance component of stability requires the body to perform many repetitions of an exercise in order to see improvements. Dr. McGill advocates for using a descending pyramid rep scheme with 10-second isometric holds in order to enhance stability without fatiguing and over-working the body.
A typical program would be to perform five reps, then three, and finally one to end (each with an 8-10 second hold). Rest between each set for 20-30 seconds. As this rep scheme becomes easier, it is recommended to increase the amount of repetitions rather than the duration of the holds in order to build endurance without causing muscle cramping (3). This can be freely modified to suit your current individual level of endurance and goals (for instance using a 6-4-2 or 8-6-4 rep scheme).
At Poseidon Performance we have achieved effective results using this protocol during the rehabilitation phase with both patients and athletes.
The Side Plank
Following the effective training stimulus of the anterior core muscles, we need to focus on the lateral side muscles of the core. The side plank is a unique exercise as it activates the lateral oblique and QL muscles on only one side of the body, making it an excellent choice for addressing weak links in stability while placing minimal forces on the spine. It also engages an important stabilisers of the hip/pelvis on the lateral hip (the glute medius) (12).
Step 1: Lie on your side with your legs bent and upper body supported through your elbow. Place your free hand on your opposite shoulder.
Step 2: Raise your hips so that only your knee and arm support your bodyweight.
Step 3: Hold this position for 10 seconds before returning back down. Perform the same descending pyramid rep-scheme for each side.

There are a number of ways to progress this exercise. Perform the full side plank with one foot directly in front of the other
Moving your hand placement from your opposite shoulder to the top of your hips
Full side plank (bodyweight supported by your feet and elbow)
Perform the full side plank with one foot directly in front of the other and incorporate a rolling pattern (where you tilt or rotate your body towards the ground and back towards the sky)


Ensure the shoulders, torso and upper leg are maintained in a straight line (imagine you're a door opening and closing) during this roll to keep the low back safe.
If you are unable to accomplish even the modified side plank (bridging from the knees) due to shoulder or arm pain, you can perform a side lying leg lift. Start by lying on your side, brace your core muscles appropriately and raise both legs off the floor together a few inches. Hold them for 8-10 seconds before relaxing down.

The Bird Dog
The last of the McGill ‘Big Three’ is the bird dog. This is an excellent exercise to promote a stable core while movement occurs at surrounding joints (either the legs or arms and legs together). The combination of movement occurring at the hips and shoulders while the low back remains stable allows this exercise to have excellent functional carry over to movements you perform throughout your day and with athletic performance.
Step 1: Assume an ‘All 4’s’ position (quadruped) with your back in a neutral alignment. Remember a ‘neutral’ position is a very slight arch and not completely flat.
Step 2: Without allowing any movement to occur at the low back, kick one of your legs backwards while simultaneously raising the opposite side arm until both extremities are fully straightened.
Ensure the hip extension doesn’t create hyper extension of the lumbar spine (over-arching). Focus on kicking the heel of the foot straight back. Making a fist and contracting your arm muscles as you hold it in the extended position can also increase muscle activity of the core (especially of the erector spinae muscles).

If you are unable to perform the arm and leg movement together without pain or it is too difficult without losing balance, try the modified version with only leg movement.
Step 3: Hold each extended pose for 10 seconds before retuning back to the starting All 4’s position.
Return to the All 4’s’ position (quadruped) by sweeping your arm and leg back between each repetition. Don’t let your back round during this motion but instead maintain the neutral spine position and allow the motion to only occur from the hips and shoulders.
Recommended sets/reps: Perform the same descending rep-scheme as the previous two exercises. Perform five reps, then three, and finally one to end (each with an 8-10 second hold). Rest between each set for 20-30 seconds. You can progress this exercise by drawing circles with your outstretched hand or your hand and foot together.
What About Low Back Stretching?
It was traditionally to prescribe certain stretches like pulling your knees to your chest while lying on your back if you presented with low back pain. Mainly practitioners still prescribe them simple because ‘we’ve always done that’, however research and treatment has progressed.
At the time this exercise made sense. Those who had difficulty standing for long periods or lying flat on their back often felt relief when in a flexed position. Many who complained of feeling stiff and painful in their low back had instant relief of their symptoms after performing a few of these stretches.

Following the research from Dr. Stuart McGill and evidence based practice, this stretching relief is only a temporary relief. When you stretch your low back, you are stimulating the stretch receptors deep inside the muscles that give the perception of pain relief and the feeling of less stiffness.
Most of the muscle pain and stiffness you may feel in your back is a consequence of inflammation from the real injury located deeper in the spine (disc bulge, facet irritation, etc)(5,6). The underlying injury is what causes the secondary contraction or spasm of the surrounding muscles and pain.
Therefore, optimal rehabilitation from a back injury (for a large majority of athletes) should be aimed at stabilising the core and re-educate the movement pattern. The focus should be to effectively treat the cause of the problem, rather than simple treat the symptoms and stretch the surrounding muscles to increase flexibility of the low back and potentially make the underlying cause worse.
Re-Awaken those Sleeping Glutes!
It is common to see athletes with back pain also have an inability to properly activate and coordinate their glute muscles. Dr McGill coined the phrase Gluteal amnesia. This is when your body forgets how to activate the gluteal muscles properly. Because of our sedentary lifestyle, our muscles are not working as much as they should be, in particular our gluteal muscles. This is detrimental to the whole body because the glutes are the strongest and largest muscle in the body (13) When this occurs the body naturally starts to use the hamstrings and low back muscles more to create hip extension both issues are problematic in creating efficient movement and place excessive stress on the spine (1)
If the single leg bridge test (see Squat University )exposed a problem in how your body coordinates and turns-on the glutes, the following exercises should help.
The Bridge
Step 1: Lie on your back with your knees bent as shown. Ground your feet into the floor and try to extend your legs. This activates the quadriceps and deregulates the hamstrings activation. This will allow your glutes to activate
Step 2: Squeeze your glute muscles together FIRST and THEN lift your hips from the ground.
Contract your glutes as hard as you can in this bridge position for 5 full seconds before relaxing back to the ground. If your hamstrings cramp during this motion, bring your heels closer to your hips. Shortening the length of the hamstrings puts them at a disadvantage to contribute to the movement (a concept called active insufficiency) (14)

Recommended sets/reps: 2 sets of 20 for a 5 second hold. Eventually work your way up to 10-second hold.
Deep Squat With Isometric Hold
Step 1: Hold a kettlebell or weight in front of your body and perform a deep goblet squat.
Step 2: Brace your core (imagine you’re about to punched in the stomach) and drive your knees to the side while keeping your foot grounded/rooted in an arched position (this should turn on the outside of your hips or glute medius muscle).
Step 3: Rise a few inches in the squat and squeeze your glutes hard. Hold this for 5 seconds before lowering below parallel again. This translates the glute activation from the previous exercise into something functional that mimics your squat technique. This should only be attempted if you can perform it pain free.

Recommended sets/reps: 1-2 sets of 5 for 5 second holds
Conclusion
Hopefully this blog has given you a better understanding of proper core stability training and how to perform the ‘Big 3.’
These exercises should not only be the foundation for your rehabilitation from back pain but also as a part of your daily training program to prevent future injury once your symptoms have resolved but to also prime your body prior to training and part of your warm up routine. (7)
The combination of these exercises should be safely performed daily if you are trying to recover from back injury but should not be performed directly after rising from bed in the morning. It’s recommended you don’t load the spine with heavy training for a least on hour after waking as the discs of your spine are most hydrated and prone to injury. (11)
Dr. McGill also recommends to include with the “Big 3” exercises is a regimented walking program (2). Getting up and walking throughout you day can be extremely helpful in maintaining the health of your spine. Start with smaller bouts of walking (5-10 minutes at first with a fast pace that causes you to swing your arms). The goal should be to eventually reach a 10-minute walk three times a day (2)
If you continue to have back pain I suggest following the detailed program in Dr. McGill’s book ‘Back Mechanic.’ Then, when out of pain, shift to ‘Ultimate Back Fitness and Performance.’
Bibliography
McGill SM. Ultimate Back Fitness and Performance (4thed). Waterloo, Canada: Backfitpro Inc, 2009. (www.backfitpro.com)
McGill, SM. Back Mechanic: The step by step McGill Method to fix back pain. Backfitpro Inc. 2015 (www.backfitpro.com)
McGill SM. Core training: evidence translating to better performance and injury prevention. Strength and Conditioning Journal. 2010; 32(3): 33-46
McGill SM. Grenier S, Bluhm M, Preuss R, et al. Previous history of LBP with work loss is related to lingering effects in biomechanical physiological, personal, and psychosocial characteristics. Ergonomics. 2003;46:731-746
Indahl A, Kaigle A, Reikeras O, Holm S. Electromyographic response of the porcine multifidus musculature after nerve stimulation. Spine. 1995;20(24):2652-8
Cohen SP & Raja SN. Pathogenesis, diagnosis, and treatment of lumbar zygapophysial (facet) joint pain. Anesthesiology. 2007;106:591-614
Durall CJ, Udermann BE, Johansen DR, et al. The effect of preseason trunk muscle training of low back pain occurrence in women collegiate gymnastics. J Strength Cond Res. 2009;23:86-92
Lee BC, McGill SM. Effect of long-term isometric training on core/torso stiffness. JSCR. 215;29(6):1515-1526
Cholewicki J, McGill SM, and Norman RW. Lumbar spine loads during lifting of extremely heavy weights. Med Sci Sports Exerc. 1991;23:1179-1186
McGill SM, Cholewicki J. Biomechanical basis for stability: an explanation to enhance clinical utility. JOSPT. 2001;31(2):96-100
McGill SM. Stability: from biomechanical concept to chiropractic practice. J Can Chiropr Assoc. 1999;43(2)
Boren K, Conrey C, Le Coguic, et al. Electromyographic analysis of gluteus medius and gluteus maximus during rehabilitation exericses. Int J Sports Phys Ther. 2011;6(3):206-223
McGill SM. Low Back Disorders: Eevidence Based Prevention and Rehabilitation(2nd ed). Champaign, IL: Human Kinetics Publishers, 2007.
Olfat M, Perry J, Hislop H. Relationship between wire EMG activity, muscle length, and torque of the hamstrings. Clin Biomec. 2002;17(8):569-579
Grenier SG, McGill SM. Quantification of lumbar stability by using 2 different abdominal activation strategies. Arch Phys Rehabil. 2007;88(1):54-62
Juker D, McGill SM, Kropf P, Steffen T. Quantitative intramuscular myoelectric activity of lumbar portions of psoas and the abdominal wall during a wide variety of tasks. Mec Sci Sports Exerc. 1998;30:301-310
McGill SM. The mechanics of torso flexion: sit-ups and standing dynamic flexion maneuvers. Clinical Biomechanics. 1995;10:184-192